ShenandoahSewandVac
Wednesday - Friday: 10 am-4 pm  Saturday: 10am-2pm     
​       498 North Main Street, Woodstock, VA 22664                                                     (540) 459-1888
  • Home
  • About Us
  • Contact Us
  • Products
    • Sewing Machines >
      • Repairs
      • Parts
    • Vacuum Cleaners >
      • Riccar
      • Carpet Pro
      • Central Vacuums
      • Sebo
  • Quilter's Cabin
    • Treasures of the Heart Bee
  • Photo Gallery
  • Helpful Hints
  • Classes

HEPA Filter Questions Answered

8/1/2017

1 Comment

 
Why are HEPA filters one use only? Aren't they expensive enough to wash and reuse?
Picture
HEPA (High Efficiency Particulate Air) filters are used in vacuums and air purifiers for extra protection against allergens and dust. These tend to be much more costly than normal filters and not reusable.
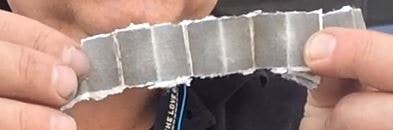
Why? The single use problem goes back into the construction of the filters themselves. In order to provide excellent filtration HEPA filters tend to be made up of a sheet of very fine glass-fiber paper folded in an accordion style to fit into a filter frame.
Picture
Washing or blow out the filter can cause damage. And a damaged filter will not screen out the particles you're trying to keep out of the air.

What can we do? There are two decent options:

1. Think about if you really need extra filtration.
HEPA filtration is great for allergy sufferers, but the general public has survived centuries without the product.

Normal filters screen out troubling particles, just not quite as intensively. They tend to be less expensive and (depending on the style) reusable.

2. Keep your vacuum bags changed or (for bagless) dirt cup clean.
If you do need HEPA filtration, take care of the filter to prolong its usefulness.

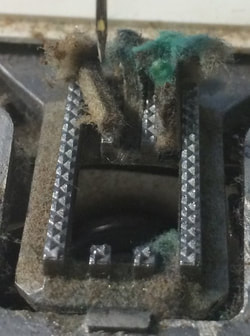
HEPA filters screen the exhaust air from your vacuum, so the best way to sustain them is to keep the rest of the machine clean. The air goes through the vacuum's bag and other filters before hitting the HEPA filter.


1 Comment

Not All That Oils Well Ends Well

11/4/2016

2 Comments


Not All That Oils Well Ends Well

Picture


Before you start lubricating your sewing machine, STOP & THINK:

What am I doing?
Don’t use 3-in-1 oil on your sewing machine! While it does have solvents to penetrate, lubricate, and prevent rust, it also leaves behind a sticky residue that will eventually cause the machine to gum up and stop working.


Picture
How do I loosen stuck parts?

Penetrating oils are great for loosening tight parts. In most cases, applying oil and letting it sit for about 5 to 10 minutes will solve your problem. (However, I have had some machines that take days to work free.)

Sadly, penetrating oil is only the first step. After the part is worked free it should be lubricated in order to keep running smoothly.

If not properly lubricated, the heat and pressure caused by the running machine will evaporate penetrating oil and the part will seize up again. This evaporation can happen in as little as 15 minutes.


Picture
When do I lubricate my sewing machine?

When it comes to machine lubrication, sewing machine oil and gun oil work best. Using sewing machine oil sparingly will keep your machine running for a lifetime, too much oil will soak into your fabric.


2 Comments

Please Clean Between Your Toes

9/30/2016

2 Comments

 
Picture
I'm talking about the feed dog toes.

Several sewing machines that were not feeding (moving) the material well visited the store recently. Something seemed to be slipping.

Theories ranged from the presser foot being worn out to the pressure on the foot being too loose.

However, taking off the presser foot and needle plate revealed the truth...

Picture
Picture
Picture
The real culprit is lint turning into felt between the toes of the feed dog and becoming matted beneath the needle plate. Once this happens, there's no longer enough space for the feed dog to move the fabric.

One machine this month had so much felt between its toes that the reverse button was banging while the machine was operating!

To repair this situation, remove the needle plate and use a safety pin or stiletto to extract the compressed lint from between the toes of the dog feed.
Be careful not to drop the felt into the machine.

When your machine is clean and happy you'll be happy too!

2 Comments

Just Zigzaging Along

7/30/2016

1 Comment

 
Picture
This week I was asked what the best zigzag sewing machine was.

As with most questions, it's not as easy as just spouting out an answer, so here are some guidelines on choosing the best Zigzag machine for you.

Zigzag machines (as opposed to straight stitch machines) come in three styles.
We'll name these categories by their bobbin designations:  Class 15,  Class 15 Front Load, and Drop-In.

Class 15
Picture
Originally, most zigzag sewing machines were in the Class 15 style.

The Class 15 bobbin case is located at the end of the sewing machine.
Picture
This style functions very well, due to the the timing being pinned (rather than screwed) in place.
In 27 years I have never had to reset the timing on a Class 15 machine.
In addition, the entire bobbin case moves with the needle as it zigzags, making sure each stitch is consistent.
Picture
The difficulty with this style, however, is removing and replacing the bobbin through the small opening.
Picture
Class 15 Front Load
Picture
To fix this problem, Class 15 Front Load machines were created.
Picture
Using a snap-in bobbin case at the front of the machine, is easier to load.
Unlike the Class 15, the bobbin case is static, meaning that the stitch is more likely to lose timing.
Picture
Drop-In
Picture
Drop-In sewing machines are the most commonly made today.

Quick and easy to load, the bobbin is placed horizontal in the bobbin case.
Picture
Just like Class 15 Front Loads however, the bobbin case remains static during zigzaging.
This may result in skipped stitches where only one side  --Left or Right -- is actually sewn.
The final decision comes down to how much effort you want to spend replacing the bobbin:
  • Class 15s are the most precise, stitch-wise, but are also the most difficult to load.
  • Class 15 Front Loads and Drop-Ins easier to load, but will also occasionally lose timing during a project.
Have any feedback or questions?  Please leave a comment, we'd love to hear from you!
1 Comment

When Things Go Screw

5/28/2016

2 Comments

 
When Things Go Screwy
Several times a month a customer comes in missing a tension screw. The story goes, " I was just loosening the screw and BONG!! it was gone." The sad part is that the screw did not need to be messed with in the first place. Usually when the tensions in a sewing machine are not working, the problem is with the top tension not the bottom. This is hard to believe when the thread is all balled up under the machine.  If it happens to you, here is a hint to help solve the problem of the missing screw.


Picture
Picture
Picture
Put a magnet in a plastic bag and slide it around on the floor and around table and chair legs. (Screws love to hide around these places.) You might just find the screw to be replaced into the bobbin case. 
Picture
2 Comments

Get the Point

5/4/2016

0 Comments

 
Picture
So you've decided what type of needle eye you want. That covers your thread choice, but how about the fabric?

The Point of a needle is very important. This is what pushes--or pierces--the thread through the fabric. Choose the wrong one and you might just ruin your sewing project.

Here's a little run down of needle Points:
Universal
Picture
Universal needles are made for average projects. The Point is... average. Not too sharp, not too blunt.

Jeans/Denim
Picture
 Denim needles have sharper Points in order to pierce through dense and tightly woven fabrics (like Denim).
DO NOT use for Leather or other unwoven fabrics.
Ball Point/Jersey
Picture
Ball Point needles are rounded on the end, so as not to tear the project. This makes them ideal for Knit and other easily unraveled or damaged fabrics.
DO NOT use for Leather or Denim
Leather
Picture
Leather needles are not only sharp, they're also bladed. This allows them to slice through unwoven fabrics (like Leather or Vinyl).
DO NOT use for Regular or Knit fabrics
Now you should be ready to pick out the perfect needle for your next project.

Having trouble threading your needle? Check out last month's post The Eyes Have It and our YouTube video on Sewing Needle Basics.
0 Comments

The Eyes Have It

3/31/2016

4 Comments

 
Picture
Needles. We know they're important for any sewing project, but why is it so hard to thread them?

Needles vary in three specific ways-- Eyes, Points, and Size (or "Weight"). Each of these factor into what the needle is best used for. In regard to threading, we'll be talking about Eyes.

The Eye of a needle is the hole where the thread goes through. On machine sewing needles, the Eye is located at the point, while hand sewing needles have it at the opposite end (this is one of the numerous reasons why NOT to interchange the two).
Let's look at some different types of Eyes:
Picture
As you can see, the Eyes of each needle are different sizes.
The smaller the Eye, the harder to thread. Makes sense, right?

So why all the different options?
Singer needles come in various sizes ranging from the 8 (small) to the 18 (large). As the needle gets bigger, so does the Eye. As you can see from the picture, the Size 18 needle's Eye is wider than the Size 8's shaft.
Small needles are for delicate projects where you don't want to leave holes in the fabric.

What if the Size 18 Eye is still too small?
Here are two options:

1. Top Stitch Needles. Top Stitch Eyes are long and wide and can be purchased in Size 14 (which is the Standard needle size)
Picture
2. Self Threading Needles. Made especially for those of us who can't slip that thread through the Eye, Self Threaders have a slot on one side which allows the thread to slide on in--no poking required. They also come in Size 14.
Picture
Hope understanding Eyes helps you thread a little easier.
For more information on needles, check out our YouTube tutorial:
Sewing Machine Needle Basics
Picture
4 Comments

Nesting Bobbins

3/2/2016

1 Comment

 
Picture
Ever had one of those days where your bobbin is keeping more thread than it can use? It bunches in the bobbin case, it bunches on the seam, it's enough to make a person scream!
This problem has many names: tangling, nesting, clotting, boogering-up....
Whatever you call it, it can turn a good sewing day into a nightmare.

It doesn't have to be this way! Here's what's going on, and how to fix it:
Picture
Picture
Much like the Three Stitch Problem, Nesting is the symptom of an upper-thread problem.

This may sound silly, since all the trouble's in the bobbin case, but it's all about the Upper Tension.
The Upper Tension is controlled by a dial.
When threading the machine, the upper thread loops around the tension control before heading up to the Take-Up Finger.

If you loop around the Upper Tension while the presser foot is up, the thread slides nicely between the tension disks as intended.
Picture
Picture
HOWEVER, if the presser foot is down during this process, the thread does not fully enter the tension disks.
This means the tension will have no control over the thread during sewing and the bobbin will catch up the extra (or "Nest").
Thankfully, there's an easy way to make sure the thread is in the right position before you start sewing.
Just give that upper thread a simple little tug to make sure it's safely in the tension disks.

Some Upper Tensions are hidden in the machine, so you won't be able to see the tension disks, but gentle tugging will still work.
Picture
Picture
What does your Upper Tension control look like? Here are some examples:
1 Comment

The Three Stitch Problem

2/2/2016

1 Comment

 
Picture
You get three stitches into a sewing project and suddenly the thread breaks!
Never fear, the culprit is probably just your Take-Up Finger.

Let's break this down:

When a sewing machine is threaded, it is easy to forget the Take-Up Finger.

The Take-Up Finger is a lever that lifts and lowers the thread with each stitch.

Depending on your machine, the Take-Up Finger will be in the front or side above the tension control.
Check out some examples at the end of the article.

Picture
Picture
Accidentally skipping the Take-Up Finger in threading leads to the Three Stitch Problem.

The first stitch or two may look fine, but something happens by stitch three...


Picture
Why does this happen?
The Take-Up Finger is needed to pull the upper thread around the bobbin and back to the surface. Without it, the thread is taut and is unable to give.


Next time the Three Stitch Problem turns up, take a look at your Take-Up Finger. Rethreading the machine may save you a lot of sewing anguish.

What does your Take-Up Finger look like? Here are a few different examples
1 Comment

Light of Hope

11/30/2015

 
Thank you to everyone who showed their support! We raised $140 for Family Promise of Shenandoah County.
Miss the special, but still want to help? Check out the Website.

Give the Light of Hope to Homeless Families in Shenandoah County

Picture
Family Promise is a parachurch ministry that helps homeless families regain their dignity and independence.
Unlike many homeless shelters, families are given private living quarters during their stay and receive financial training and assistance in applying for employment.
Most "graduate" (achieve independence) from the program in six weeks.

Shenandoah Sew and Vac wants to help give homeless families the light of hope.
That's why we're offering a special deal this December:
Bring in any lamp for repair with Family Promise Gift Certificate and get $5.00 off Labor (printable Certificate available at bottom of page).
For every Certificate used, Shenandoah Sew and Vac will donate $5.00 to Family Promise of Shenandoah County, a new affiliate which will serve Shenandoah County starting in 2016.

Here's How It Works:
A lamp repair usually costs $15 in labor. With the gift certificate: Costumers save $5 - Family Promise recieves $5 - and Shenandoah Sew and Vac makes $5.
Here's a video explaining the ministry.           "IHN" is Family Promise's former title.
<<Previous

    Author

    Shenandoah Sew and Vac is a small retail and repair business located in the Shenandoah Valley of Virginia.

    Archives

    August 2017
    November 2016
    September 2016
    July 2016
    May 2016
    March 2016
    February 2016
    November 2015
    October 2015
    September 2015
    February 2015
    September 2014
    August 2014

    Categories

    All
    5 Things
    Applique
    Bobbin Case
    Crafting
    Dog Feed
    Family Promise
    Filters
    Food
    Fundraiser
    Gift Certificate
    HEPA
    Lamps
    Needles
    Oil
    Party
    Quilting
    Repairs
    Selling
    Sewing
    Sewing Machines
    Take-Up Finger
    THRIVE Life
    Upper Tension
    Vacuums
    Zigzag

    RSS Feed

Powered by Create your own unique website with customizable templates.